Reaper explainers
- Reaper is powerful because it’s entirely customisable
- It’s ‘extensible’ meaning it allows users to create and modify fundamental tools (eg through open source extensions). If you can dream it, you can do it
- Most DAWs are designed for making music — the ability to customise reaper for documentary and podcast work is a huge advantage
- These tools allow for faster, more creative audio editing and mixing
- Reaper runs locally, uses less computer juice and rarely crashes
- Reaper is significantly cheaper, has a one-time fee, a tiered pricing model, and free updates for life
- This guy made a very long (too long) parody bagging out pro tools
A config refers to the configuration of the reaper software itself. Reaper is fully customisable. You can customise buttons, shortcuts, third party tools, and code almost anything into it. These changes to reaper impact the interface of the software and create a ‘configuration’. This ‘config’ can be exported and loaded onto other computers. You only use one config and it impacts the tools/actions of the software. Any config can open any reaper session.
The shortcuts and layout that comes with reaper is referred to as the ‘default config’.
A template refers to a customised and pre-saved montage. This includes things like: layout of tracks, track names, colours, and importantly, FX on tracks (such as EQ/compression). You can create and save multiple templates depending on the shows you work on. Templates for documentary work are limited in efficiency because every doc has so many variables, whereas templates for weekly shows — with the same elements every time — are more effective.
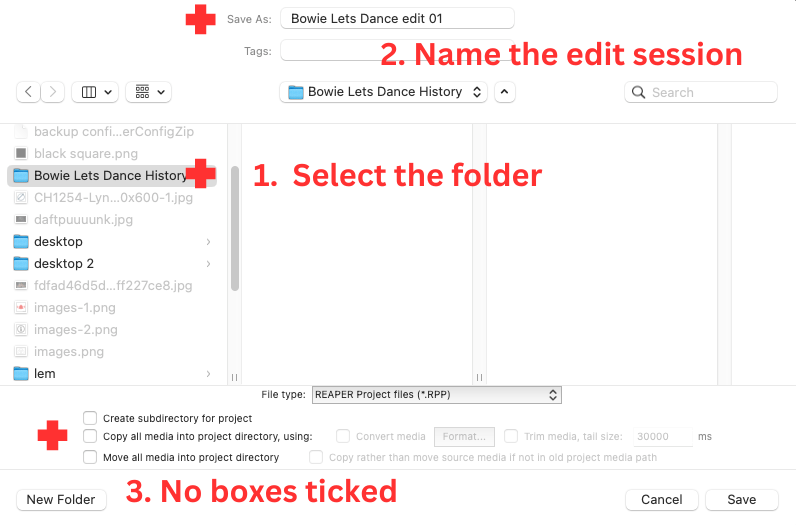
Create a new folder and name it. [eg Bowie Lets Dance History]
Open reaper. Hit ‘shift and s’ to ‘save as’. [NB saving a reaper session for the first time ‘command and s’ will automatically give the ‘save as’ pop up].
Find the path to the folder you just created.
Give a name to the montage. [eg Bowie Lets Dance edit 01]
Ensure boxes are not selected.
Hit save.
Use the ‘iterative’ save-as approach when saving your edit session.
For example, when I started my edit, I saved it as: ‘woman meets bowie 01’
As I progressed, I was sure to ‘save-as’ often. With every save-as, I increased the number. See the picture below for how this developed.
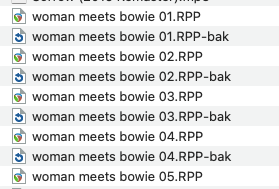
The iterative save-as is best practice for the following reasons:
- Mitigates risk of loss due to file corruption
- Easier to go back to a previous idea
- Easier to collaborate (add initials and throw it to your colleague eg woman meets bowie 06 LC’)
- No more ‘final FINAL 4’ stuff — the last session is the most recent
- Gives you confidence and forward momentum when editing
Do an iterative save-as after lunch, when you’re about to make a scary big edit, before you add narration. I use it as often as I need to, not uncommon for me to go over 100.
Tip: the above note is about save-as (shift and s) however, best practice saving means you’d be saving (command and s) every couple of minutes as a habit. Practice saving as a reflex.
Another tip: the backup generated save-as folder reaper automatically creates is only there in an emergency. Don’t rely on it.
Follow these three steps to ensure all audio files are not lost and edit sessions open every time, with all audio intact:
- Manually drag the audio file into the session folder
- Ensure the file is named correctly
- Drag the correctly named file from the session folder into the edit session
Here is my starting point for a naming convention:
YYMMDD Full Name IV
Date is in reverse order so it appears chronologically in the folder. Full name of guest obviously, and ‘IV’ to tell me it’s an interview. Other tags are ‘ATMOS’ and ‘SFX’. Baking the file category into the file name (instead of a folder) means it can be copied between projects and I will always know what it is.
YYMMDD Street Name ATMOS
YYMMDD Full Name IV ATMOS
YYMMDD Fridge door open SFX
If I have multiple recordings done on the same day, I will number the files so they appear in the order in which they were recorded.
YYMMDD 01 Full Name IV
YYMMDD 02 Full Name IV
YYMMDD 03 Full Name IV
If I’m recording an interview with multiple mics (into the one recorder) I would use this format.
YYMMDD 01 Stacey Chapman IV STACEY SIDE
YYMMDD 02 Stacey Chapman IV MIKE SIDE
If I have multiple recordings on the same day with different microphones a will add a letter to indicate what mic it was on. Eg if I used zoom internal mics I will add Z to the file name.
Notice where I put the letter. It’s just before the number so the clips stay grouped, in their chronological order once they’re in my folder. If the letter was after the number the clips would appear jumbled. I want them to stay grouped by mic type so when I import to my edit session they appear in order.
YYMMDD Z01 Full Name IV
YYMMDD Z02 Full Name IV
YYMMDD Z03 Full Name IV
YYMMDD R01 Full Name IV
YYMMDD R02 Full Name IV
YYMMDD R03 Full Name IV
If I have an interview spread out over multiple clips I will add a number at the end of the clip. I don’t write ‘part 1’ and ‘part 2’ — I just know if there’s a number on the end of the file name it’s part of a bigger series of the same thing.
YYMMDD Z01 Full Name IV 01
YYMMDD Z02 Full Name IV 02
YYMMDD Z03 Full Name IV 03
For zoom recordings, if I have backup files (recorded automatically -10db), generally I will use the exact same file name as the original but add ‘_BU’ to the end of the file name. I might copy all of the backup files into a folder, so if I don’t need any of them I can just delete it later. (yes, I just broke my no-folder-within-a-folder rule — customise your system so it works for you).
YYMMDD Z01 Full Name IV_BU
YYMMDD Z02 Full NameIV_BU
YYMMDD Z03 Full Name IV_BU
There are different recognised approaches to file management:
Eg. Hierarchical
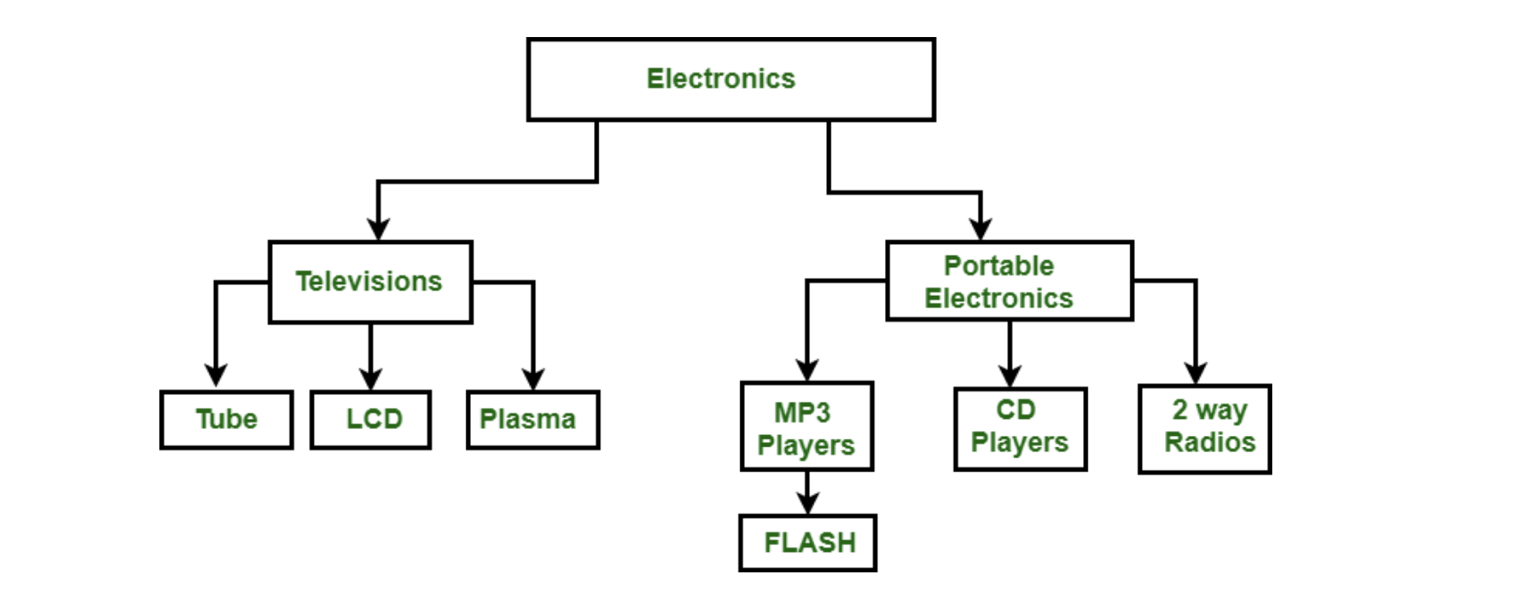
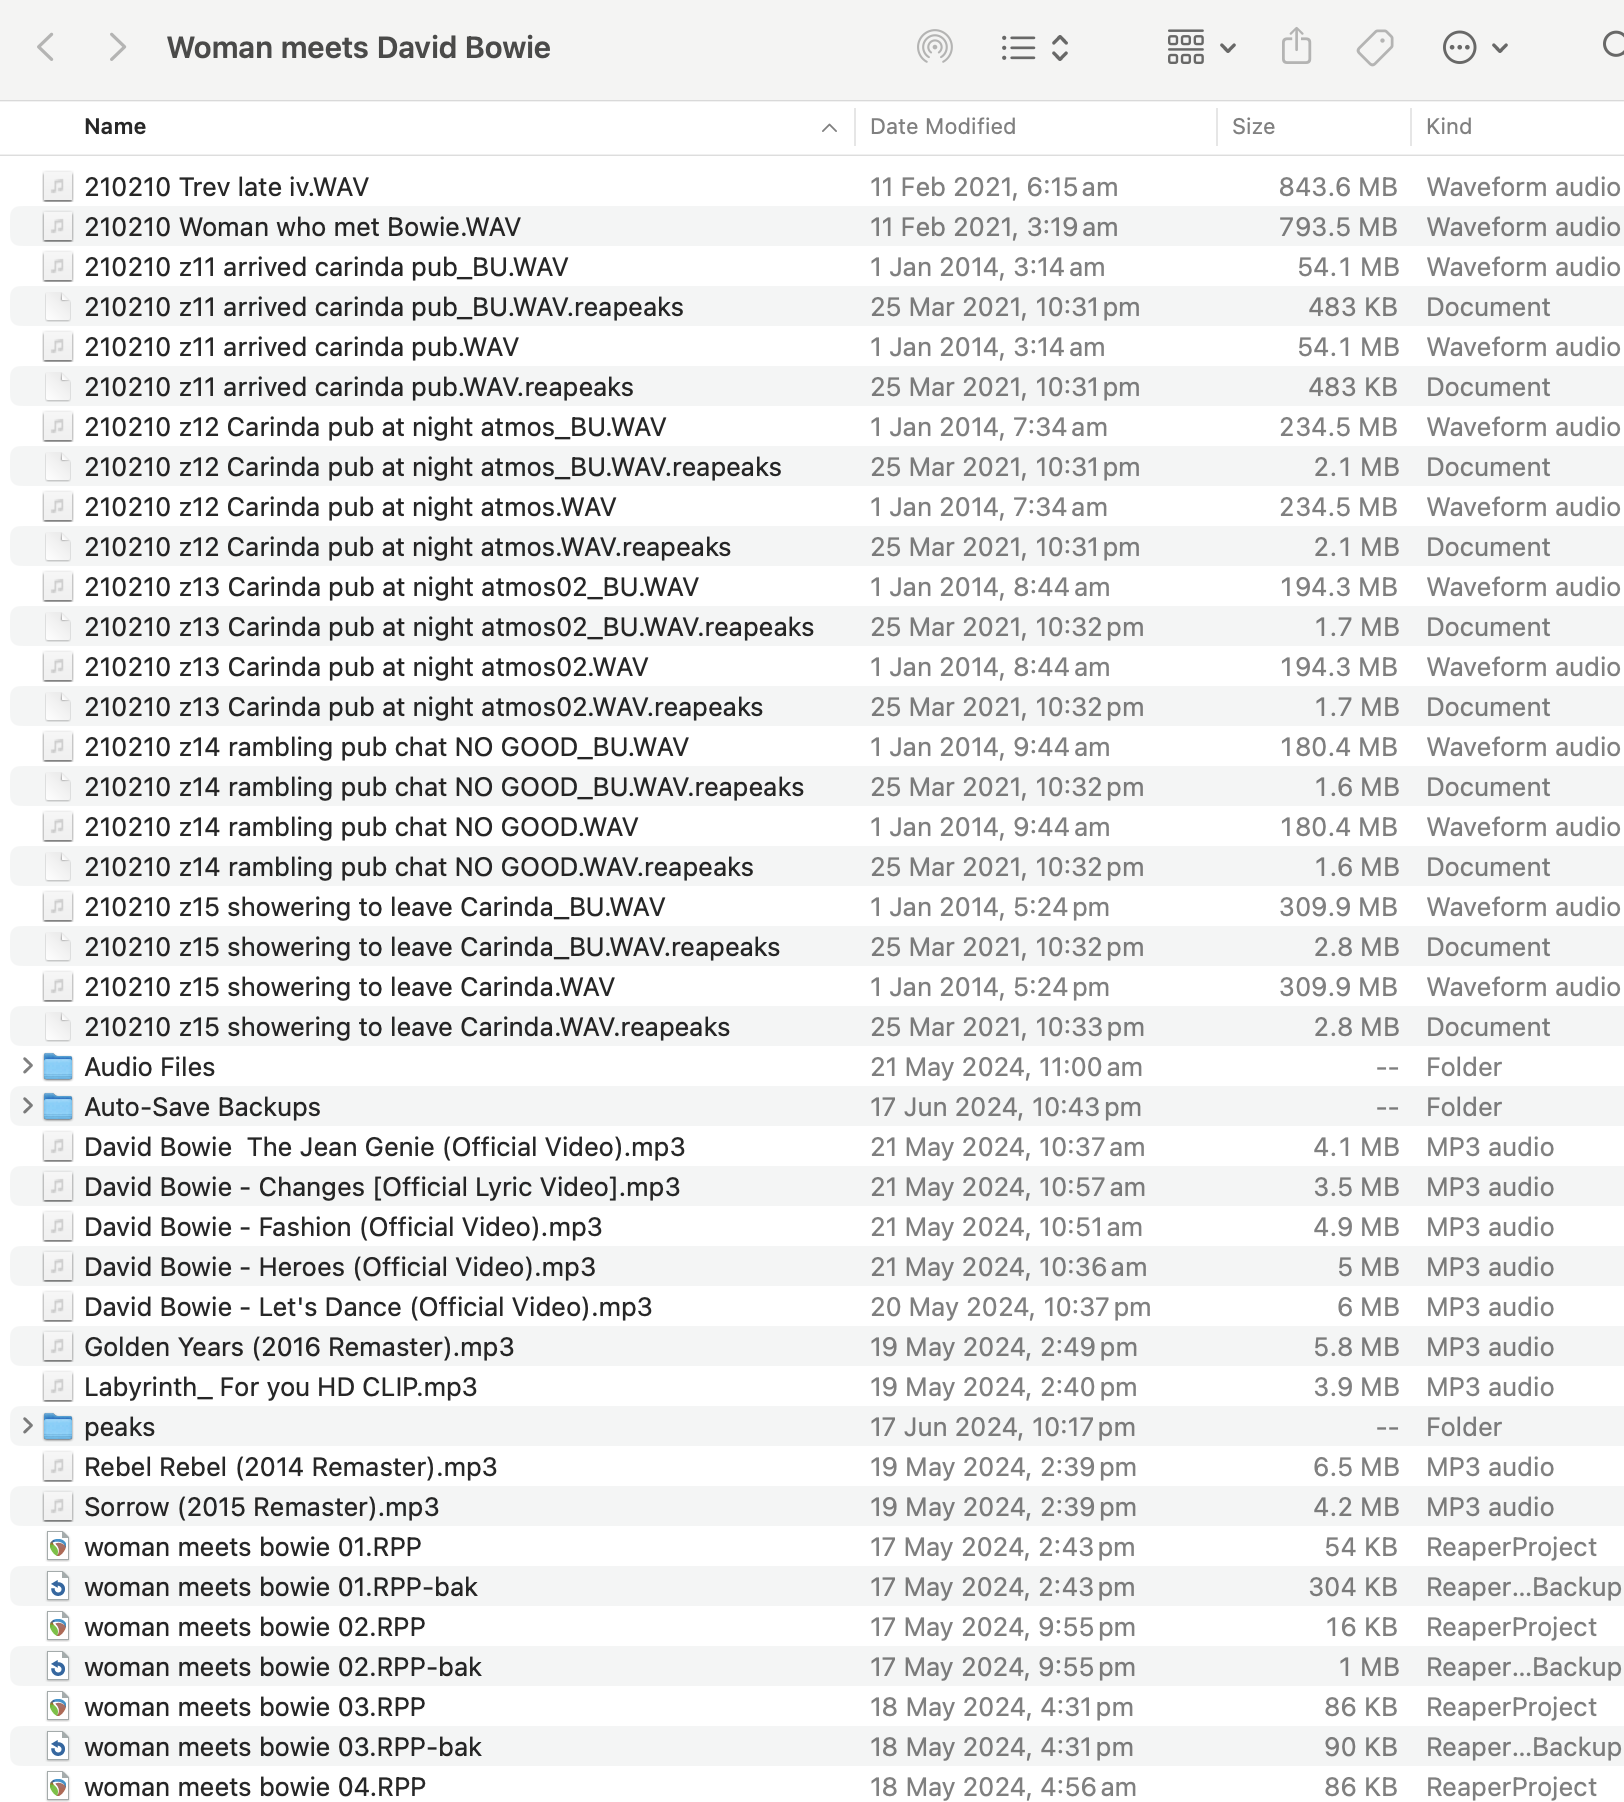
For managing files in an edit session, I use a ‘flat’ approach — all files are in one folder.
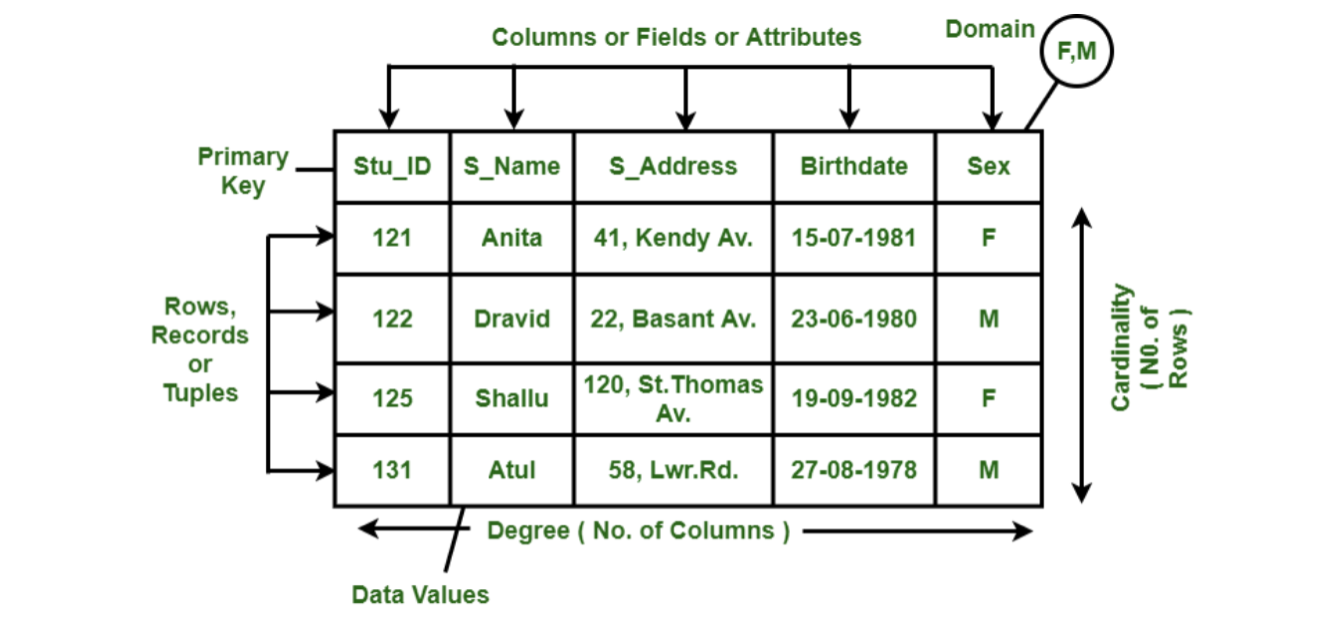
Everything is ‘flat’ like a spreadsheet where you can see everything at once. I do not create sub-folders for different types of files, this is how things get messy. This system relies on detailed information in the file name, a strong file naming convention, and for files to be named chronologically.
The ‘one folder’ approach is a proactive step to manage files at the start of the workflow that mitigates the chance of lost files down the track that might be disconnected when moved between subfolders or cannot be found due to poor naming.
Advantages to this approach:
- No unique knowledge required to understand subfolder categories
- Find audio faster by not having to search in subfolders
- Save time by not having to ‘sort’ files into multiple subfolders
- Clearer path for reaper to find files. Ie. less ‘reconnecting’
- Instant archive process sorted. Forces me to focus energy on best practice file naming convention. This helps with session management generally (everything is named coherently) but also solves a secondary problem of archiving — I can find files easily years later because I can search for them
Tip: when using a flat file management approach, sort the files by name and kind using the list view. Here’s an example. NB some subfolders are automatically created by reaper, never delete anything that is automatically generated.
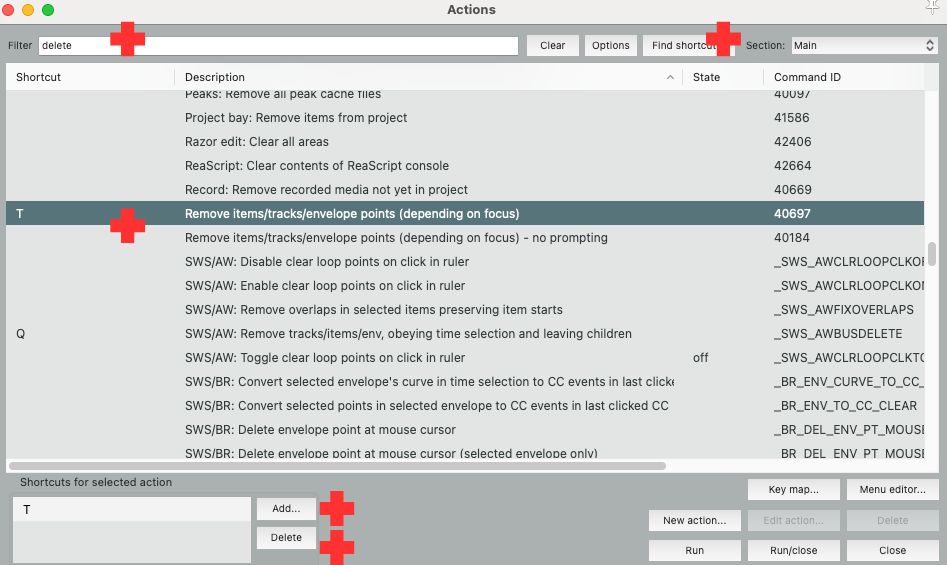
In the menu bar at the top of the screen hit Actions > Show Action List…
Or if using the provided config, hit the question mark button ? [shift and /]
Search for the shortcut. Knowing the name of the shortcut is sometimes the hardest part, you might need to use google to describe the action to find out its name.
NB you can also search for a shortcut by entering the existing shortcut itself (if known). Look for the ‘Find Shortcut…’ button.
Select the shortcut by clicking on its name to highlight it.
Go to bottom left corner of window and delete existing shortcuts for this action by selecting and hitting the delete button.
Tap ‘Add…’ button to add your shortcut.
A box will pop up. Whatever you enter on your keyboard will be recorded (tip: use your mouse to click ok, not ‘enter’ otherwise enter could become part of the shortcut!)
Pop up message will confirm if you want to override? The answer is yes!
Boom – you’ve done it.
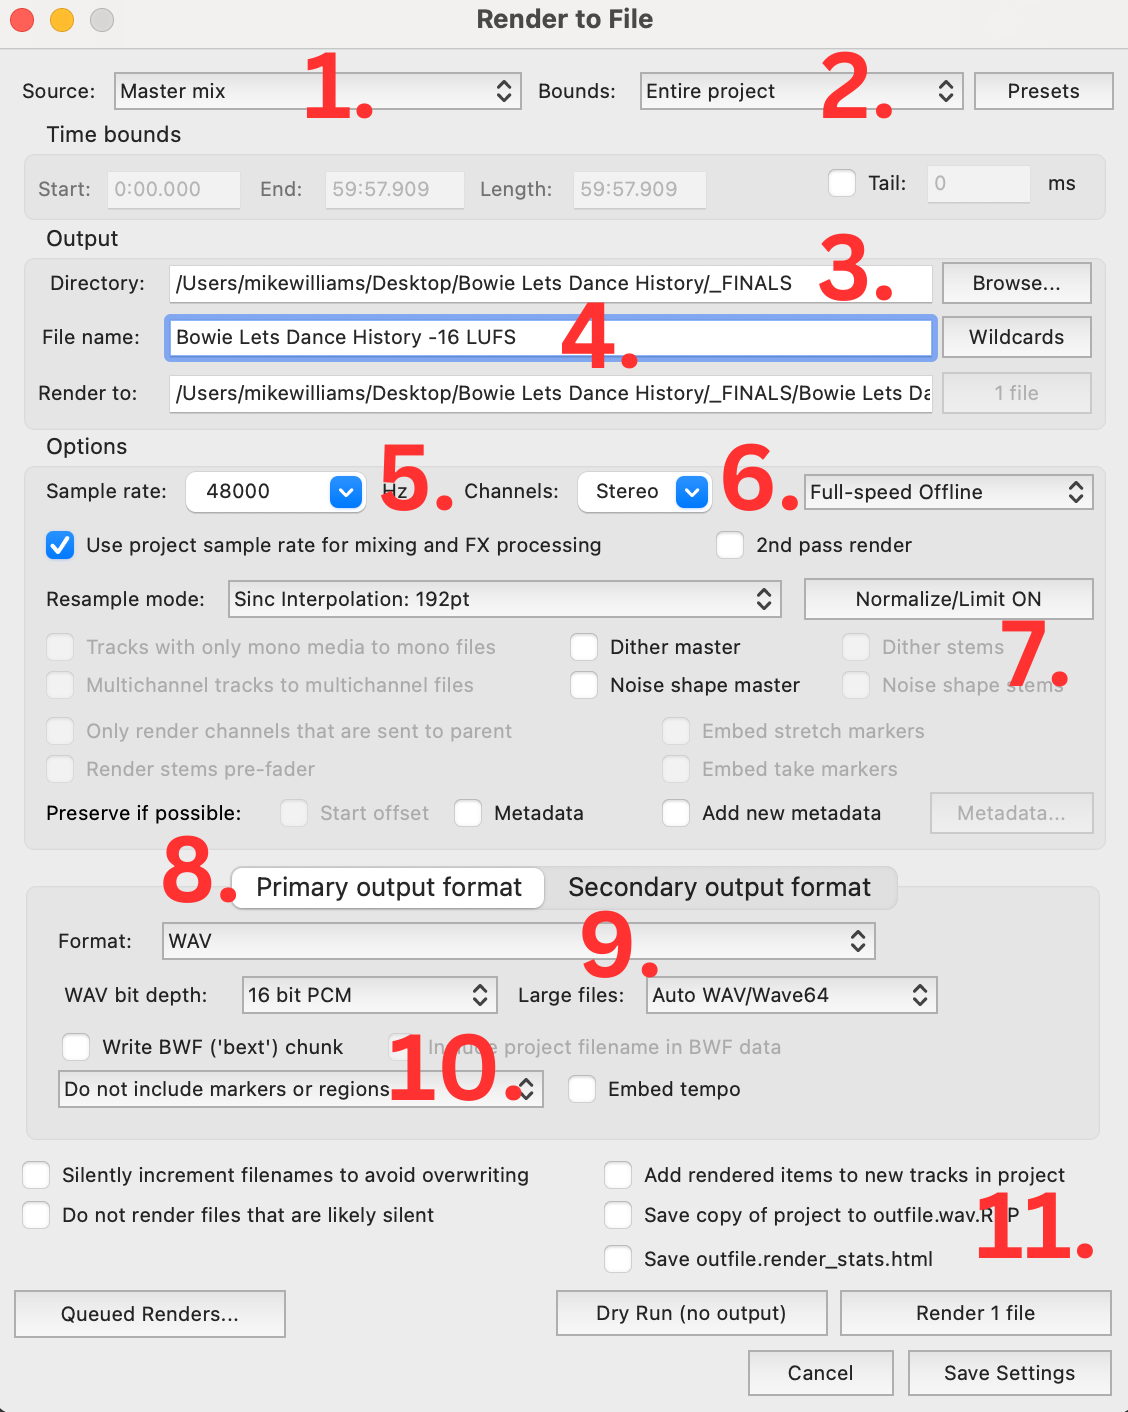
Check these ten things when rendering:
1. Master Mix — the final mix with all FX on the master track. Browse this dropdown menu to see other options. Most are not relevant except for, ‘Selected tracks (stems)’ which can be useful when needed.
2. Entire Project — this will render everything in the montage. This includes random clips you’ve accidentally left up the back of the timeline. Sometimes, you will only want to render a section of a montage. Click and drag the mouse along the ruler at the top of the montage to select a specific time. Use ‘Time Selection’ in the dropdown to only render this section.
3. Directory — choose where the file will be saved. I create a folder in the edit montage called ‘_FINAL’. The _ keeps the folder at the top of the file list. You can create it manually in the folder or just write it ‘_FINAL’ into the end of the directory and the folder will be created during the render.
4. File Name — name of the rendered file
5. Sample Rate — 48 00
6. Stereo — would you like the file to be mono or stereo?

7. Normalize/Limit ON — this is a bit of a magic button. Press it to provide you a the option of a ‘post process render’. This means after the render, process the file one more time but Normalize (if ticked) to X LUFS and then put a Brickwall limit (if ticked) to X dB. These tools are very blunt instruments. They are handy to use because they visually demonstrate how far off you were to a ‘perfect’ master. If you were mixing to -16 LUFS and no normalization was required, your mix was perfect. Unless you’re compressing the hell out of it, you won’t get a perfect mix but you should be within 1 or 2 db from the target. If you are, a little final squeeze with normalisation tool won’t hurt it. If you’re way off the mark though, you might want to go back and adjust your mix.
8. Primary Output Format — you can render two files at once. This is handy as most times you might need an MP3 for the podcast upload and also a highest quality WAV for your archive.

NB for the ‘Secondary output format’, the industry standard for a podcast audio file is MP3, 192kbps.
9. Format — WAV or MP3
10. WAV bit depth — 16 bit PCM
11. Render 1 File — punch it!